Today I present to you: Another Machine Learning tutorial that no one asked for.
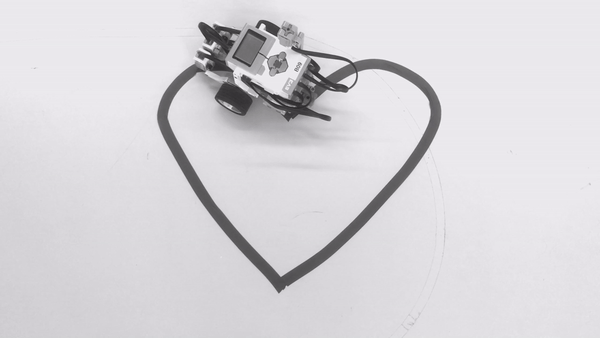
As part of my master thesis, I developed a workflow and exercises to bring Machine Learning (ML) to LEGO Mindstorms EV3. To give you a bit of background about my thesis, my aim is to create an educational programming environment to teach high school students about Machine Learning algorithms using LEGO Mindstorms. Finding a suitable task for teaching kids (or rather teenagers) ML algorithms wasn’t the easiest considering the limited resources and sensors the EV3 has to offer. I call the task that I outline in this post the “MNIST of tiny robots that can’t see”, as we’re going to build a robot that can classify digits or shapes on the ground.
Prerequisites
To follow this tutorial, a basic knowledge of programming and Python is necessary. This is something I’m really hoping to change with my current research (shameless self-promo), as I think a basic understanding of Machine Learning algorithms never hurt nobody and should be accessible to anyone.
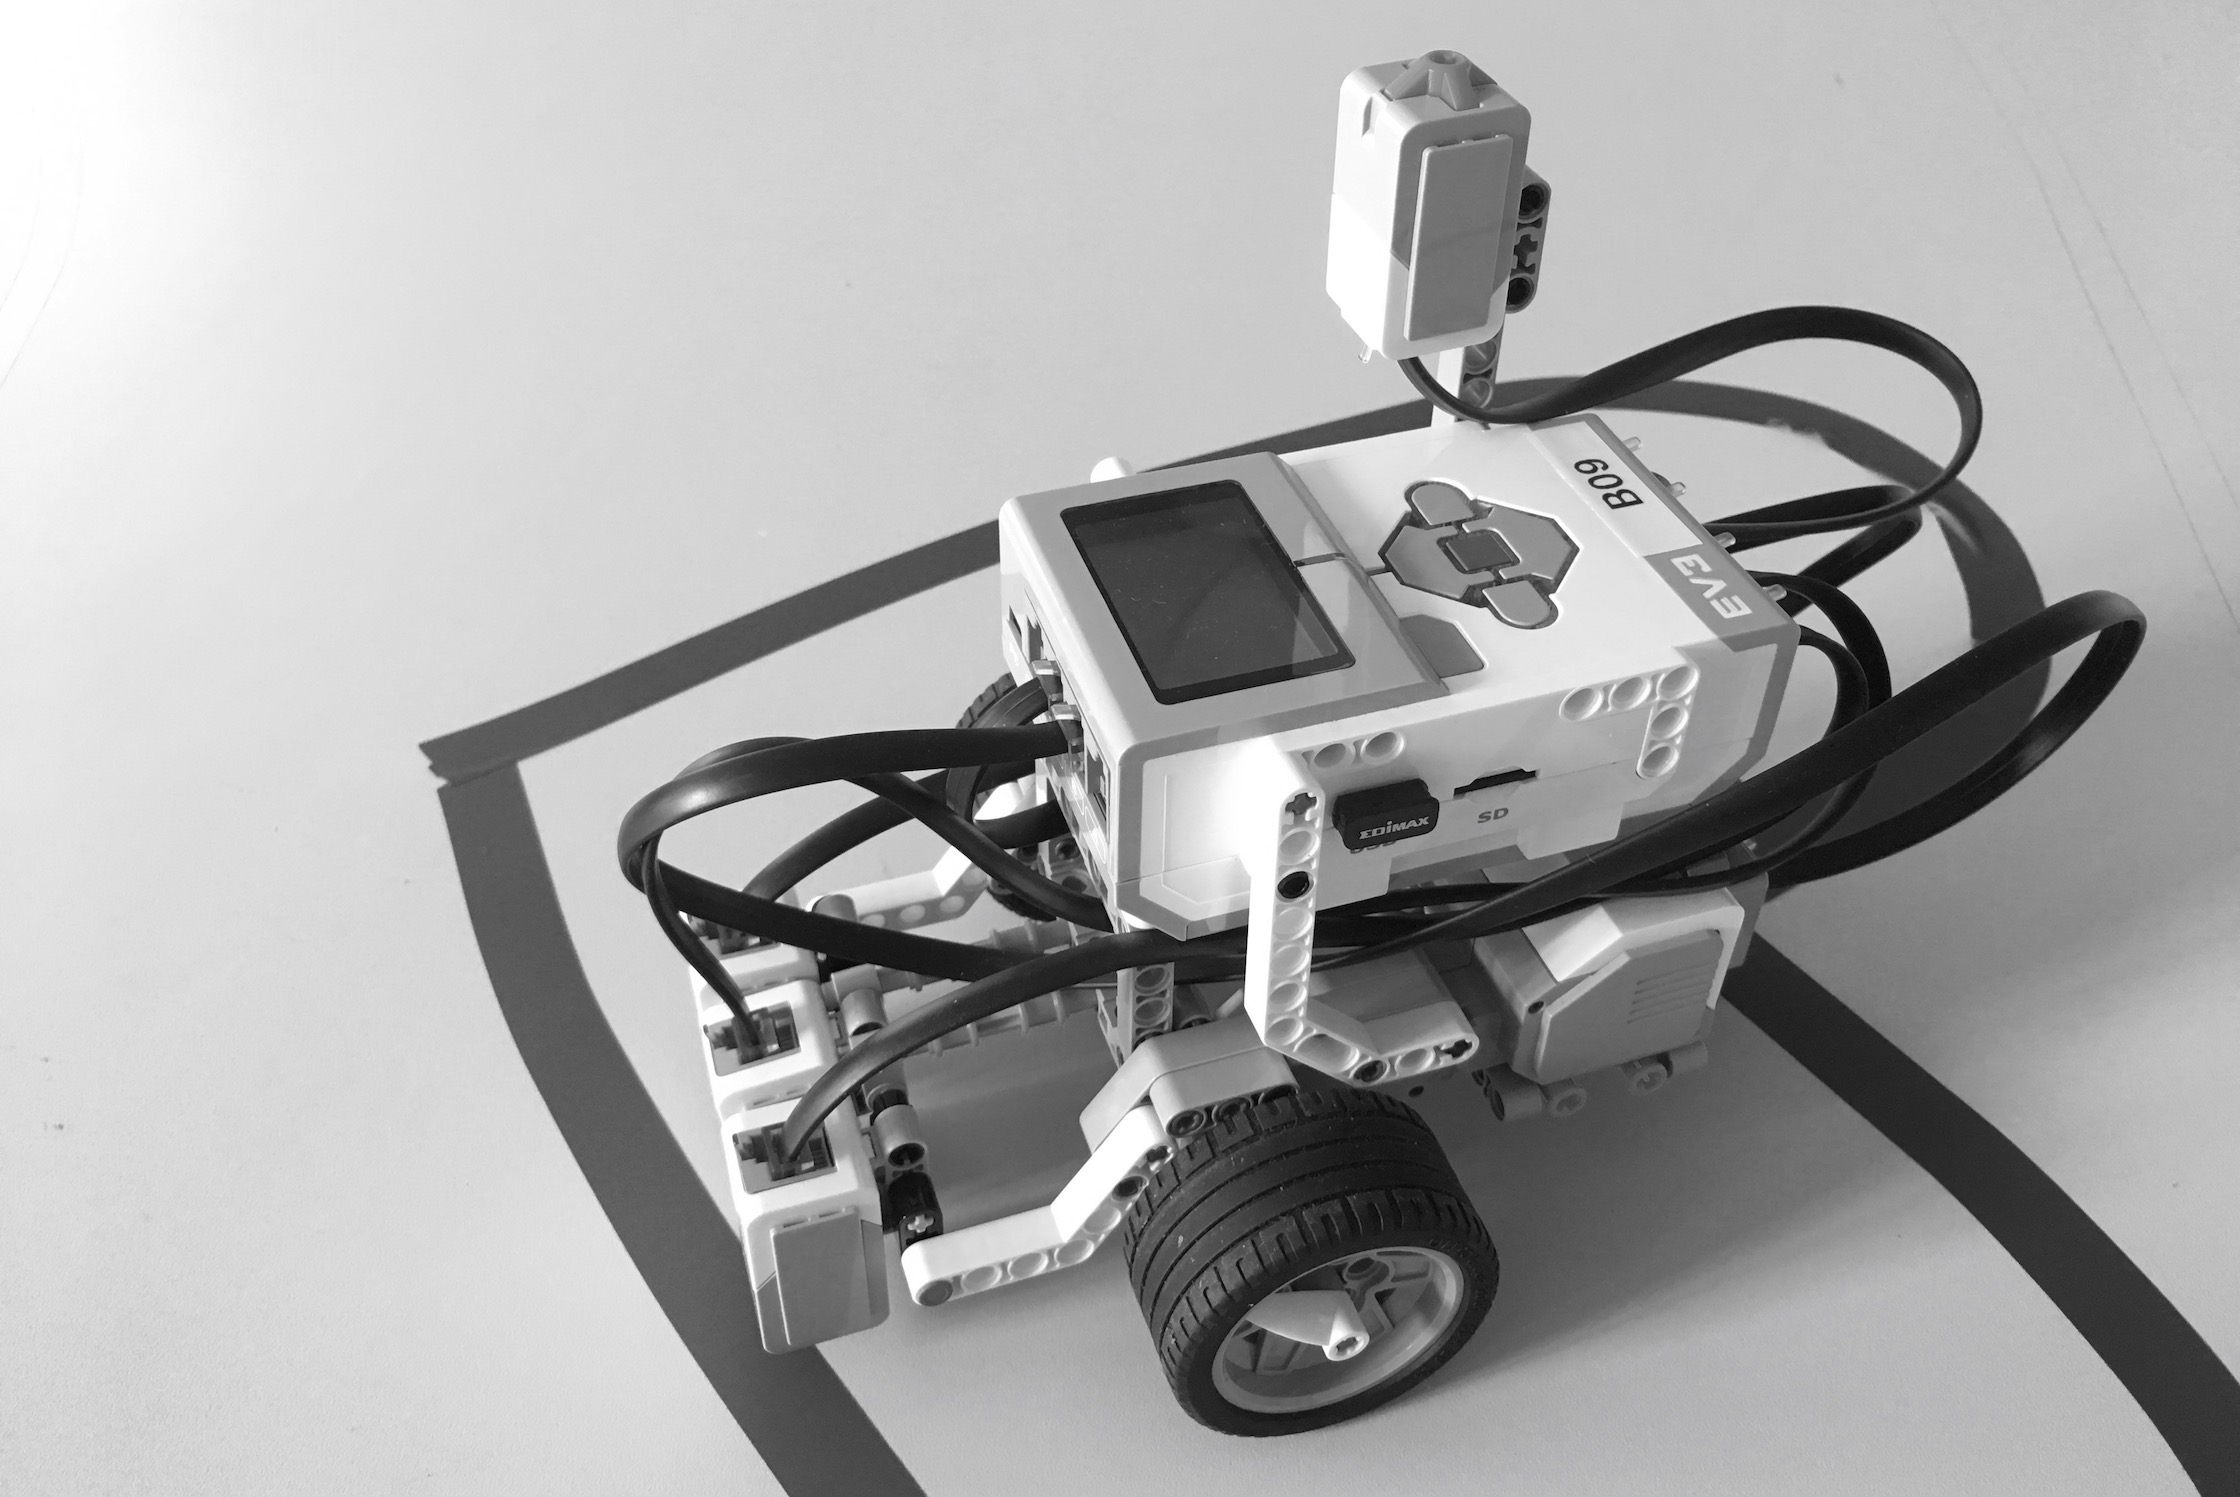
For this tutorial you need the Lego Mindstorms EV3. You can follow the instructions on the official LEGO page to build the robot that I built, or be creative and build your own. I added two more color sensors, so I have three color sensors set up in a row. You could do the tutorial with only one color sensor as well. However, all the scripts and the training and test data are based on three sensors and you will need to alter the code a bit to make it work with one sensor. Moreover, I added a touch sensor to the robot with which I can terminate the program.
To create shapes and digits that the robot can follow, you need tape. It doesn’t necessarily have to be black tape, but it has to have a width of around 1.5 to 2 cm.
On the EV3, you need to have ev3dev running. They have a great tutorial to get you started with the operating system. On a computer you can follow this tutorial to set up Visual Studio Code for your EV3. Once you connected your EV3 to VS Code on your computer, open a SSH terminal by right-clicking on the EV3 instance in the device browser. Then, install all the libraries that we’ll need for the tutorial with the following command.
sudo apt-get install python-numpy python-matplotlib python-scipy python-pandas python-sklearn
All the code that is mentioned in this tutorial can be found on GitHub.
A very shallow introduction to Machine Learning
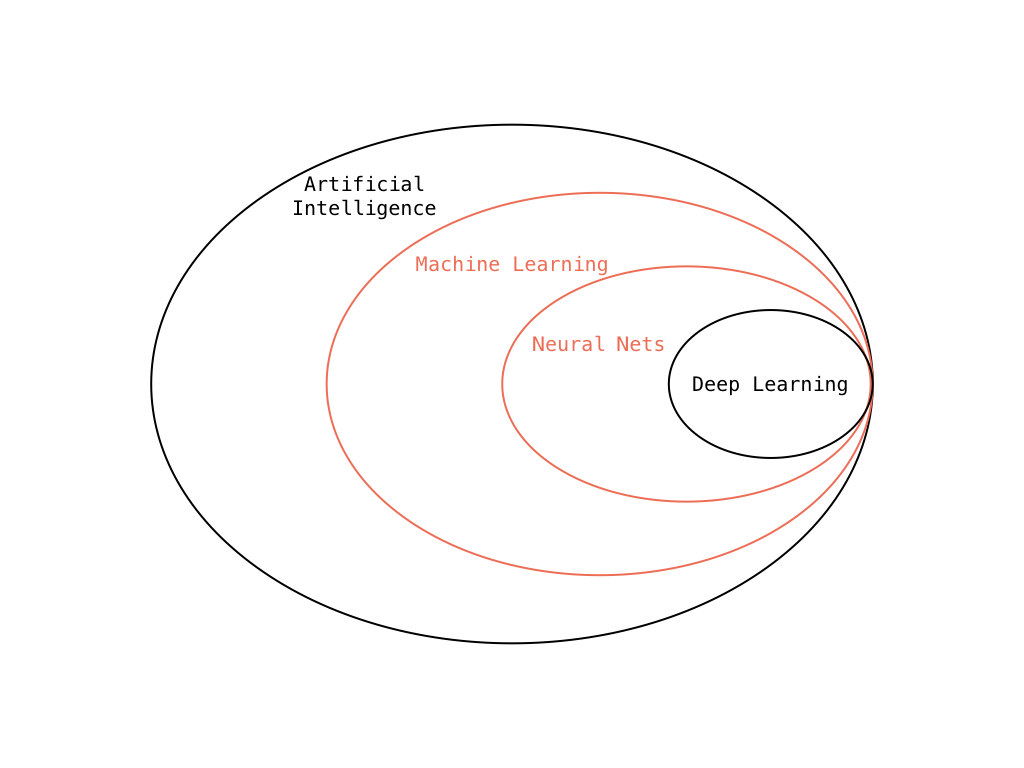
To put it in simple terms, Machine Learning is predicting something based on some kind of data. With all the media attention that this computer science field got in the last years, let’s quickly sort out this buzzword bingo. Machine Learning is not equal to the term Artificial Intelligence. Also Machine Learning is not just Artificial Neural Networks. There’s a bunch of different Machine Learning methods. We’ll work with a few different ones including neural networks in this tutorial.
To be specific this tutorial is about classical Machine Learning and to be even more specific we are only going to learn about supervised learning algorithms to solve a classification problem. As opposed to unsupervised learning, the machine learns with labeled data. This means that while learning the machine gets the answers with the data. In our case we are going to use the sensor data that has been collected while following the line of a digit or shape. We label each collected data point with the answer, meaning the class of the digit or shape the robot followed. In the rest of the tutorial I will use the term training and test data.
As the task “Classifying Digits and Shapes” already foreshadows, we’re dealing with a classification problem here, so we want to categorize data in some way. Another set of problems that you often deal with in Machine Learning are regression problems. For instance, predicting stock prices is a regression problem.
In this tutorial, we are going to look at the following algorithms:
- K-Nearest Neighbors
- Support Vector Machines
- Logistic Regression
- Multi Layer Perceptron (Feedforward Neural Network)
All these algorithms can be used to solve classification problems. There are awesome tutorials on each of these algorithms that explain in depth how they work and they can definitely do it much better than me. For the sake of completeness, here’s me trying to explain each of these algorithms in one sentence:
K-Nearest Neighbors
Look at the classes of the 3 (this is the mysterious k which is a parameter you can set) nearest neighbors of one data point and then make a majority decision to predict the class of that data point.
Support Vector Machines
To classify your data, separate your data points with two parallel lines and make sure the two lines are as far apart as possible.
Logistic Regression
You categorize your data points with a log-odds function, where everything below the function belongs to one class and everything above the function belongs to another class.
Multi Layer Perceptron
Unicorn magic shit, so wow! All joking aside, this just can’t be explained in a single sentence. MLPs are Feedforward Neural Networks which is the simplest type of neural networks. The training of these networks is done through something called Backpropagation. You can find a very nice introduction to Neural Networks in this blog post.
One last thing I’d like to touch on is the difference between binary and multinomial classification. When you look at the GitHub repository, you’ll see that besides the digit classification, I tested some of the algorithms on a binary classification problem. Instead of digits I categorize circles and squares. Wrapping your head around these Machine Learning algorithms is a lot easier when you start with just two classes. Some classification algorithms like MLP naturally support multiple classes, others like support vector machines and logistic regression need to be modified to support multiple classes.
To implement all these algorithms, we are going to use scikit-learn which is a Python Machine Learning library. The great thing about scikit-learn is that all the aforementioned algorithms are already pre-built, so you can just start using them on your data and it’s usually just two to three lines of code.
The Line Following algorithm
 Photo by Samuel Zeller on Unsplash
As a first step, you will need to develop a line following algorithm. There are hundreds of tutorials on how to make a robot follow a line. I highly suggest that you try out some different approaches. Keep in mind that digits have quite sharp angles that the robot has to be able to follow. As mentioned before, you can develop an algorithm with one or even three color sensors. In the repo you will find two different line following algorithms. The first version of the line follower is a very basic implementation that doesn’t work too well on sharp angles and turns. The second version of the line follower is tailored to the very specific task of following a digit’s shape and might not be the most performant algorithm when it comes to following a curvy line. You can use one of my algorithms, but I highly suggest that you try to develop your own. I’m sure there’s a much better solution than mine.
Data, Data, Data
The Machine Learning algorithms I introduced before don’t just magically work on any problems that we apply them to. You need training and test data for that. When you look at other Machine Learning tutorials, they usually work with an open-source data set like MNIST. Unfortunately, there’s no out of the box data set for our problem, so we need to create the training and test data ourselves.
When collecting the data yourself, you have to think about the features that are important to the classification problem. In our case, all the sensor data (three color sensors & acceleration of the two motors) that we have is essential for classifying the digits or shapes. The line following scripts in the repo automatically write all sensor data into a text file.
f = open("data.txt", "w+")

# Write sensor data to text file
f.write(str(col_left.value()) + "," + str(col_mid.value()) + "," + str(col_right.value()) + "," + str(left_motor.speed) + "," + str(right_motor.speed) + "\n")
You can easily create your own data by running that script on any digit. After each run, save the text file for a digit on your computer through the Upload option in VS Code. Just right-click the data file in the device browser. I won’t sugarcoat it: Collecting the training and test data that is included in the repo was annoying and took quite some time. However, I would still recommend you collect the data with the line follower of your choice, as I collected the data on the v1 line follower. Given the results, I think getting 40 data points for each digit or shape was a little bit of an overkill. I reckon 25–30 for each digit or shape will do the trick.
The Basic Workflow
Once you collected your data, it’s time to check out the different algorithms for our classification problem. Before getting started with training a model, we need to make sure that the data we collected has the correct format. There are a few noteworthy things here. The robot might need longer to drive over some digits and shapes than others. Therefore, we need to make sure that the data sets are equal in length. There are different approaches to solve this. I decided to pad the data with zeros, so that they all have the length of the longest data set that’s been collected:
def pad_arrays(array, longest):
    if len(array) < longest:
        filler = longest - len(array)
        filler_array = []
        for i in range(0, filler):
            zero_array = [0, 0, 0, 0, 0]
            filler_array.append(zero_array)
        return np.concatenate((array, filler_array), axis=0)
    else:
        return array
Moreover, we’re working on sequential data (time series data) right now which is not the best fit for the algorithms listed above. To make things easier to understand, we take the average of each of the different sensor values.
Additionally, you need the correct classifications for the training and test data which I simply created for the digit data with the following function.
def class_array():
    driven_digits = []

    for i in range(1, 10):
            for j in range(0, 32):
                driven_digits.append(i)

    return driven_digits
As soon as you have your X (training and test data points) and y (the answer (class) to each data point in X) for training the model, the procedure is very straightforward and similar for each algorithm:
- Split data into training and test data
- Scale the data if required
- Create the classifier
- Fit the model to the training data
- Make predictions for the test data
- Print the confusion matrix and the classification report
X_train, X_test, y_train, y_test = train_test_split(X, y)

scaler = StandardScaler()
scaler.fit(X_train)

X_train = scaler.transform(X_train)
X_test = scaler.transform(X_test)

mlp = MLPClassifier(hidden_layer_sizes=(13,13,13),max_iter=500)
mlp.fit(X_train,y_train)

predictions = mlp.predict(X_test)

print(confusion_matrix(y_test,predictions))
print(classification_report(y_test,predictions))
Training the different models can be done on your computer instead of the EV3. This is much faster and more convenient if you want to try out multiple algorithms and play with their parameters.
To figure out which model solves our problem the best, you can compare the results of the classification report and the confusion matrix. Below you can see the classification reports for logistic regression, MLP and support vector machines.
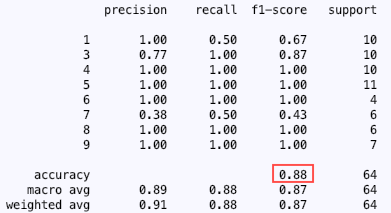
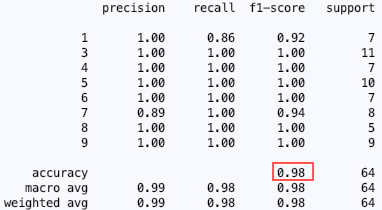
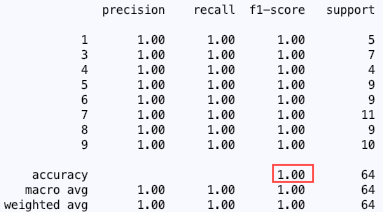
In my case, the support vector machine performed the best on the test data. In the classification reports for the MLP and the logistic regression model, you can see that both models had a hard time differentiating between 1 and 7 which is not surprising considering their similar shape. However, neither logistic regression nor the MLP model performed badly. For this particular problem, I would say that anything above 80% accuracy is a very good result. Just keep in mind: for the 8 classes (8 different digits to classify) anything over a 12.5% accuracy would be better than guessing the digit.
Once you found the model that works best on your data, you can save that model with pickle or joblib and then import the trained models to your digit classifier script. This script should include your trained model and the line following algorithm of your choice. If you scaled your data, you should not forget to save and import the scaler as well. If you trained the model on your computer instead of the EV3, make sure that the library versions are equivalent on both machines.
# Load model and scaler
loaded_model = pickle.load(open('./digit_models/trained_model.sav', 'rb'))
loaded_scaler = pickle.load(open('./digit_models/mlp_scaler.pkl', 'rb'))

# Apply scaler
X_new = loaded_scaler.transform(X_new)

# Classify new data
y_new = loaded_model.predict(X_new)

# The robot tells you the predicted digit
Sound.speak(str(y_new[0]))
Last Words
I hope that this gave you a good idea on how to work with Machine Learning algorithms on the EV3. I have a few side notes that I didn’t know where to fit, but still think are important, so here it goes:
scikit-learn vs. TensorFlow
Initially, I wanted to use TensorFlow. However, TensorFlow doesn’t run well (or at all) on the EV3. In the end, I very much preferred scikit-learn over TensorFlow, as it provides more than enough algorithms to get started with Machine Learning and it is way easier to get into.
Be creative (for me)
Although I highly doubt that this post will get a lot of readers: In case you’re in that “I like computer science, education, robotics and machine learning” niche like me, please contact me if you have any other ideas for classification or regression problems or if you have feedback for this tutorial. As I mentioned before, I’m currently working on my master thesis which you can read more about here. Criticism, tips, tricks and hints are highly appreciated.